Update 26 March 2020: Free LabVIEW During the COVID 19 Pandemic – Read More
Table of Contents
LabVIEW License for Education – 6 Months
Section 1: Register NI User Account
Note: If you already have a National Instrument account, skip to Section 2: https://apiit.atlassian.net/wiki/spaces/ITSM/pages/218857972/NI+LabVIEW+2019+Installation+Guide#Section-2%3A-Login-and-Download
Step 1 – Registration form
Go to https://lumen.ni.com/nicif/us/evallvstudent/content.xhtml using your web browser. You will see a form to create an NI User Account.
Fill in the appropriate fields with the following details:
Role | Student |
School | Asia Pacific University of Technology & Innovation (APU) |
School Address | Jalan Teknologi 5 |
City | Kuala Lumpur |
Province | Wilayah Persekutuan Kuala Lumpur |
Postal Code | 57000 |
Email address | TP email (Format: TPXXXXXX@mail.apu.edu.my) |
Note: It will show “Enter a valid email address” when you enter the TP email. This is normal and you can still click on Create Account to register.
Once all the details have been entered, click ‘Create Account’.
Step 2 – Confirm account creation
Once you submitted the form, you will be asked to confirm your account. National Instruments (NI) will send an activation email to the email that you registered with. The Email might take up to an hour to receive in your mailbox.
If you didn’t find the confirmation email, check your Spam folder or click Resend.
Once you find the email titled “Please confirm your NI user account”, click on the link to activate your account.
Once you click on the link, your account will be activated. Click Continue.
Section 2: Login and Download
Note: If you completed Section 1, skip to Step 2: https://apiit.atlassian.net/wiki/spaces/ITSM/pages/218857972/NI+LabVIEW+2019+Installation+Guide#Step-2-%E2%80%93-Download-Software
Step 1 – Login
Go to https://lumen.ni.com/nicif/login.xhtml and login to your NI User Account.
Step 2 – Download Software
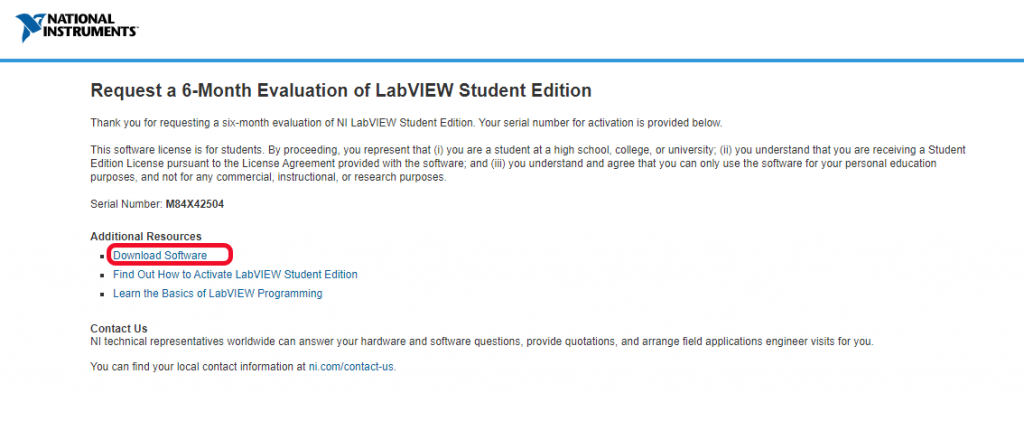
After you activate your account/log in to your user account, you will see this website.
Note: You will be given the Serial Number. This Serial Number will be valid for 70 days. You can always come back to this website to view the Serial Number if you need to reactivate in the future.
Under Additional Resources, click on ‘Download Software’.
You will see this download page to download LabVIEW. In Application Bitness, select 64-bit. Leave other settings to default.
Note: If you are using different Operating System, such as MacOS, you need to change Supported OS to the correct settings.
Once you choose the settings you need, click on ‘Download’.
When prompted, login to your account again.
When prompted, in Primary Job Activity select Other.
Once everything is done, you will see this page and the download will start. If the download doesn’t start, click Restart the download link.
Section 3: Installation
Once the download completed, open the downloaded file and the installation process will start.
Step 1 – Install NI Package Manager
Before the LabVIEW install, you will need to install Package Manager.
Select “I accept the above license agreement” and click Next.
When prompted about disabling Windows Fast Startup, click Next.
On this page, click Next. The installation will proceed and it will take a minute.
Step 2 – Install LabVIEW and drivers
Once the Package Manager had been installed, the LabVIEW installer will show up.
On this page, select the components you wanted to install. By default, all the essentials components had been selected automatically.
Once you are done selecting the components to install, click Next.
On this page, you will be given the option to select additional items to install. Leave it to default and click Next.
Select “I accept the above 3 license agreement(s)” and click Next.
Select “I accept the above 3 license agreement(s)” and click Next.
When prompted about disabling Windows Fast Startup, click Next.
On this page, click Next.
The installation will proceed and it will take 15 minutes to an hour depending on your Internet connection.
When the installation is completed, you will see this dialog box. Click on Yes if you want the software to update automatically. To prevent unnecessary update checking, click on No.
Next, you will see a dialog box to opt-in to their Customer Experience Improvement Program. Select “No, I do not want to participate in the NI Customer Experience Improvement Program” and click OK.
Step 3 – Activate LabVIEW 2019
After the installation is completed, you will be requested to activate LabVIEW. Click on Log in to Activate.
You will be prompted to login to your account. Enter your NI User Account credentials and press Enter.
Once you successfully logged in, you will see a list of software that needs licenses.
Note: Don’t click on Activate or Extend Trial yet.
Since we are given a Serial Number to activate, click on the dropdown box and select Enter a serial number. In all the textboxes, fill in the Serial Number.
Refer to Section 2, Step 2 for the serial number:https://apiit.atlassian.net/wiki/spaces/ITSM/pages/218857972/NI+LabVIEW+2019+Installation+Guide#Step-2-%E2%80%93-Download-Software
Once you fill in the Serial Number in all the text boxes, click Activate. It will start activating the software by checking the serial number.
If the serial number is working, you will see LabVIEW 2019 SP1 Student Edition is activated. Click on Finish.
Click on Reboot Now to complete the installation.
Section 3: Installation Complete
To launch LabVIEW, in the Start Menu type in “NI LabVIEW 2019” and press enter.
If you see this when you open LabVIEW, it means your LabVIEW is activated properly.
Support
If you are facing any difficulties or errors during the installation/activation process, please open a ticket with our HelpCentre – IT Helpdesk or email assist@staffemail.apu.edu.my via your student email address. Please ensure to provide necessary screenshots and error messages for the support team to better understand the issue.


