...
This guide is to help staff to set up and install printer on their macOS computer. Before we start to install the printer, make sure your computer is connected to either Wireless@APU or BYOD@APU to Staff@APU 2.0 network.
Part 1: Connect Mac to Printer Server
...
Fig 1.0: Connect to the printer server
| Table of Contents |
|---|
...
Step 1 - You have to first make a connection between your macOS computer and printer server to communicate with printers. Figure 1.0 shows, from the top menu bar click on, Go > Connect to Server.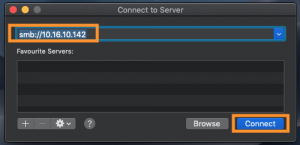 .
.
...
Fig 1.0: Connect to the printer server
Step 2: Enter ip address “10.61.10.142”. click Connect.
...
Fig 1.1: Enter printer server address and connect
...
Fig 1.2: Attempting to connect to the server
Fig 1.1 shows, when you open Connect to Server, you have to enter server address 10.16.10.142 and click Connect. It will attempt to connect to the printer server and ask you to confirm your connection, please click Connect to confirm your connection to the server (see Fig 1.2).
...
Step 3 - Enter staff account credentials. Click Connect.
Step 4 - Select AddFollowU folder.
...
Fig 1.3: Enter Staff account credential and click connect. Select ‘AddFollow U’ and click OK.As shown on Fig 1.3, it will ask your staff account credential to connect to the server and to have access to the server files, click Connect. After you have entered your staff account credentials then, you will get access to AddFollowU folder in the server.
...
AddFollowU folder contains the print client installer file that you have to install on your Mac
...
.
...
Step 5 - YSoft SafeQ External Installer > YSoft SafeQ Client for MacOS X > Click on the .dmg Disk Image file (YSoft SafeQ Client Mac OS X-4.9.dmg).
– Step 6 - The disk image file contains the installer file .pkg (Ysoft SafeQ Client Mac OS X.pkg), double click on this file and install it on your macOS computer.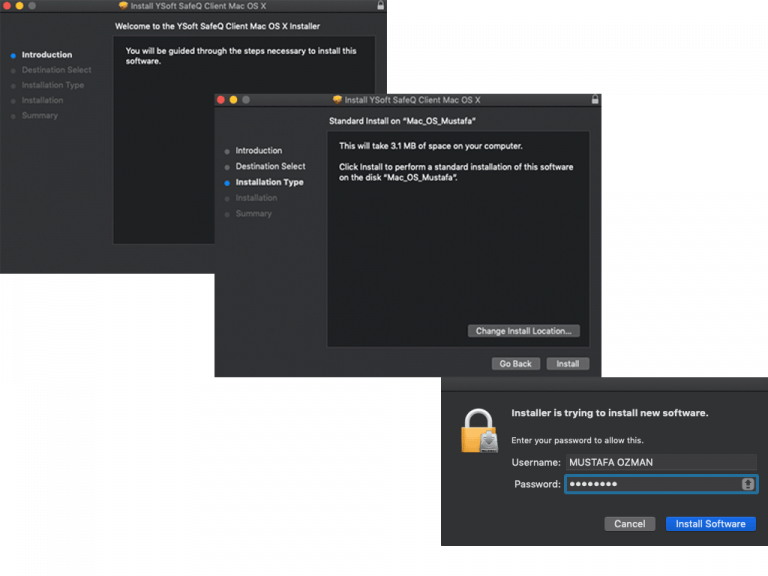
...
Fig 1.
...
4:
...
Find the print client
...
installer file in server folder
Step 7 - The installer will guide you through the installation of the print client and for security reason reasons, it will require your computer admin account credentials to install the software (see Fig 1.5).
...
Fig 1.
...
5: Installing print client requires computer admin account credential
| Info |
|---|
Please make sure you have closed all applications and saved your work before installation because you will be logged out to finish installing the software |
...
. |
Step 8 - Click Log Out and , and you have now successfully installed the print client on your Mac to communicate with the printer server.
...
Fig 1.6: Save all your work and close all applications before you install because you will be logged out to complete installation.
...
Install & Setup Printer
...
Fig 2.0: Find version of macOS
Now we will install the printer driver on our Mac to communicate with printer machines connected to printer server. First we need to check which version of macOS running on our computer, you can check this information from the top .
Step 1 - Top menu bar; click on Apple Logo > About This Mac. We need this information because we have to download correct version of printer driver for our macOS..
...
Fig 2.0: Find version of macOS
The next step is to download and install the printer driver, follow the steps below;
...
Fig 2.1: Search for printer driver on Google
Step 2 - Go to Google.
Step 3 - Search “fuji xerox 3320 driver for mac”.
Step 4 - Click on the first link.
...
Fig 2.2: Download printer driver and Install it
...
| Info |
|---|
make sure you select right macOS version and download Mac Printer Driver file and install it. |
...
Fig 2.1: Search for printer driver on Google
...
Fig 2.32: Set up the printer you have just installed on your computerDownload printer driver and Install it
After you have installed the printer driver then, you have to set up printer on your computer (see Fig 2.3). So you can send documents to the printer machines connected to printer server to be printed.
Step 5 - from the top menu bar; click on Apple Logo > System Preferences > Printers & Scanners > Click on Add (+).
...
Fig 2.4: Customise Toolbar and add Advanced option3: Set up the printer you have just installed on your computer
On the Add window, you should see Advanced option at toolbar, but if you do not see it then, you have to right click on the toolbar and from drop down menu click Customise Toolbar and another window will pop up. From this window you can see items that you can add to to your toolbar, drag Advanced and drop it on Add window toolbar and click Done.
...
Step 6 - From the add window, right click on the toolbar.
Step 7 - From the drop down menu, Click Customise toolbar.
Step 8 - Another window will popup, Click add to your toolbar > Drag Advanced and drop it on add window toolbar, then click Done.
...
Fig 2.5: Configuration communication with print server4: Customise Toolbar and add Advanced option
Now click on Advanced, here you have to do configuration to set up the printer (see FIg 2.5);
...
Step 9 - Type
...
: YSoft SafeQ connected network printer
Step 10 - URL: 10.
...
61.10.142
Step 11 - Name: Print@APU
Step 12 - Click on Choose a Driver and from drop down list click on “Select Software..”
...
Fig 2.
...
5: Configuration
...
communication with print server
Printer Software window will pop-up and select the printer driver you have just installed on your computer, you can also search the printer driver “3320” from the search bar on the top right. After you have selected the printer software, the window will close and you will go back to Advanced Tab and click on Add. It will start setting up the printer and do not change anything here, click OK.
...
Fig 2.76: See the printer in the list of Printers & Scanners.Configuration printer driver set up
Result - After you have set up your printer, you should see Print@APU in the list of Printers & Scanners. This means you have successfully installed and setup printer on your macOS computer and start printing documents.
...
Fig 2.7: See the printer in the list of Printers & Scanners.
...
Support
| Info |
|---|
In case of further inquiry, please open a ticket with the Virtual Help Centre. Alternatively, you may choose to access APSpace > More > Help Centre for further guidance and support. This guideline is designed for you to help you in the process of opening a ticket. |