...
To improve the user experience and enhance wireless security, we have replaced original wireless networks (Wireless@APU, BYOD@APU, Roam@APU and Staff@APU) with OnBoard@APU, which streamline the configuration process and works with all major OS platforms.
This article will highlight the steps to configure your Android Apple iOS device to connect to this new network.
...
Initial setup for OnBoard@APU
Step 1 . - To start connecting to OnBoard@APU, turn on your Wi-Fi on your Android iPhone/iPad device and connect to the Onboard@APU network.
...
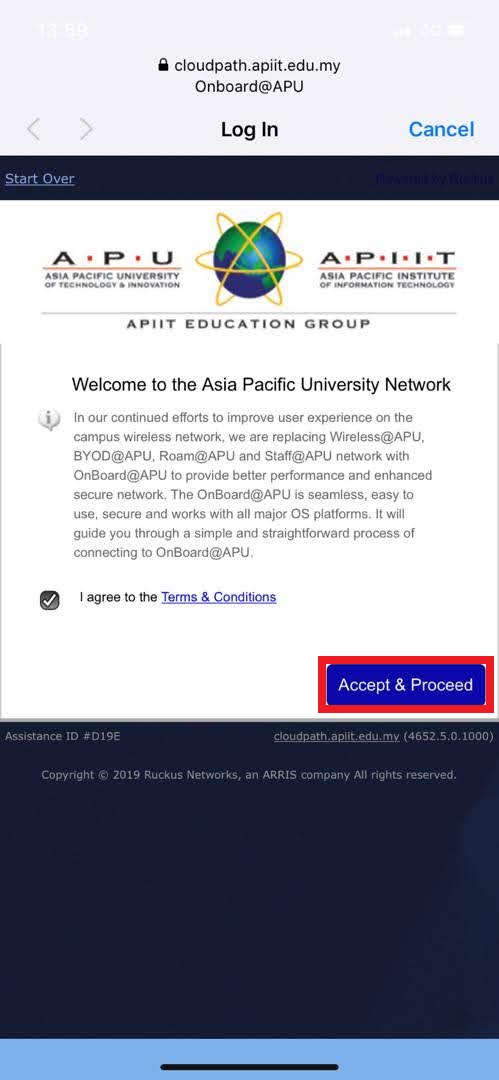
Step 2 . After - Once you are connected to Onboard@APU, you will be , open your browser and enter https://onboard.apiit.edu.my. Once redirected to the following website. , Click Accept & Proceed.
...
Step 3 . - In this page, select the network according to your situation. If you are:
...
| Info |
|---|
APU Staff should use their APKey/Office 365 Username & Password to Loginlog in. |
...
Step 4 . - If you are a staff or student, you will be presented with a login screen. Enter your APKey credentials (Example as below) and click Continue.
Student | Staff | |
|---|---|---|
|
| ||
|
|
|
|
...
Prerequisite installation
Step 5 . - After a successful authentication, you will be presented with this page. Click on Install The Network Download for iPhone, iPad & iPod.
...
Step 6 . - You will be presented a window to download an app from various App Storesallow the download. Click on Google Play (Recommended) but others work fine as well Allow.
...
7. You will be redirected to the Ruckus Cloudpath, an Arris Company page in Play Store. Click on Install to download and install the app required for network authentication.
...
Running connection setup
8. Once the app has been installed, click Open and exit the app to allow the app on standby.
...
9. Now, open the browser page with the installation instructions. Click on Install The Network again. If nothing shows up or not redirected, click on the alternate option link in the fine text and try again.
...
10. You should be redirected to the CloudPath app. Click on Next.
...
11. You will be prompt to give Location Access to the app. Select While using the app.
| Note |
|---|
Due to Android security, newer Android version requires app developer to ask for Location permission in order to scan and change device Wi-Fi settings. If you deny the grant, the configuration will still work but your device will not automatically connect to the correct Wi-Fi (Student@APU 2.0, Staff@APU 2.0 or Visitor@APU 2.0) after configuration. |
...
12. Once the permission is granted, the app will attempt to connect to the network and validate your connection.
...
Step 7 - Once the download has been completed successfully, Click on Close
...
Install Wi-Fi Profile Setup
Step 8 - To install the Wi-Fi profile, Navigate to Settings.
...
Step 9 - Click on General.
...
Step 10 - Click on Profile.
...
Step 11 - Click on Student.
...
Step 12 - Click on Install
...
Step 13 - Enter your Phone’s Passcode
...
...
Finish connecting to Staff@APU 2.0 / Student@APU 2.0
Once the setup installation is successful, you the profile will be redirected to apu.edu.my to confirm that Internet connection is working.
...
mentioned with ‘Profile Installed.’
...
You can access your control centre WiFi settings to confirm that you are connected to the correct Wi-Fi. You should see the Wi-Fi-connected is Staff@APU 2.0/Student@APU 2.0/Visitor@APU 2.0 and not Onboard@APU.
...